Friday, May 11, 2018

Converting My WSM to a Charcoal Grill for Steak Kabobs

A few weeks ago I was smoking a slab of ribs to try out a new recipe, not intending for ribs to be our dinner. And my wife decided we should have steak kabobs. Given I had the WSM fired up, I decided to take a shot at turning it into a standard Weber kettle charcoal grill to cook the kabobs. Turns out, it was very easy to do, and was a nice improvement on taste from my usual Weber gas grilling.

Only Using the Bottom Bowl

As anyone familiar with a WSM knows, it comes in 3 pieces. There's the bottom bowl, where the charcoal sits. The middle section which holds the water pan and 2 racks. And then the top piece, which is the lid. 

For this exercise, I just got rid of the middle section and placed the top grate directly on top of the bottom bowl, with the charcoal just below it as usual.

2-zone Grilling Setup

2-zone Setup with the Rack on Top

I lit a new chimney of charcoal to get some really hot coals. I then put them on the usual bottom charcoal rack, but all on one side. This was so I could have a 2-zone grill such that the side of the rack that sits directly over the charcoal is very hot, and the opposite side of the rack away from the charcoal isn't getting direct fire.

Closed with the Lid on Top

I then put the lid of the smoker on top of it to close everything off so it could get really hot, given steaks need the grill to pretty much be as hot as possible for a nice sear. To help it get hot, I made sure that all of the vents were open so the air flow would be pouring through and keeping the coals going.

Note that while this setup works well, there is no natural groove for the lid to sit on the bottom bowl (since it's not technically meant to do this), so you just want to be careful you don't bump it or it could easily slide off and fall.

Steak Kabobs on the "Grill"

After letting the grill sit with the hot coals and lid on top for a while, I decided the grill was hot enough to cook my kabobs. I wasn't exactly sure how hot it was (I didn't use my usual grill thermometer and didn't trust the built-in thermometer given the way it was setup), but I started with my kabobs directly over the coals. Not an important part of this post, but I was cooking steak-house marinade kabobs pre-made at Whole Foods.

When I'm cooking on my gas grill that I know so well, I would usually give these kabobs about 4 min on a side, then flip for another 4 min, and then 1 min each on the sides that hadn't touched the grill yet. This is to come away with them cooked medium rare. I decided to follow that approach on this and see if it was cooking too fast or too slow using my Thermapen meant thermometer.

In this case, it turned out that they needed to cook for closer to 15 minutes as opposed to my usual 9-10 minutes. Not a huge difference, but clearly it wasn't as hot as my gas grill is. This can be fixed next time by allowing the hot coals to stack higher, closer to the grate, as opposed to having them really flattened out as I did this time around to be careful.

However, I will say at the end of cooking, the outside of the kabobs was getting a nice char, and to prevent it from getting too much more, I moved the kabobs to the indirect heat side for the final 5 minutes, and that seemed to work really well (this is what you can see in the above picture).

Finished Product - Steak Kabobs on a WSM

The kabobs ended up being cooked perfectly medium rare, and had a really nice traditional charcoal grill flavor to them. I considered this a nice upgrade over my usual gas grill. So I will definitely utilize this technique going forward. It takes more time and effort relative to my convenient gas grill, so this probably won't be a regular occurrence, but it's definitely going to be worth it on occasion to mix it up.

Thursday, November 16, 2017

Smoked Turkey (Thanksgiving Preview)

SMOKING RECIPE CLIFF NOTES:
- Clean out turkey insides and trim fat
- Inject the turkey with a light salt brine
- Make the salt-free rub and mix with some water to make a wet rub
- Cover the turkey in melted butter
- Spread the wet rub all over the turkey
- Put the turkey on the smoker at 325F until the breast meat hits 160F (~13 min/lb)
- Pull the turkey, carve it up, and serve

Next week is Thanksgiving, and for the first time, we are hosting some family. And so that means, I am in charge of cooking the turkey. So naturally, I decided I'm going to smoke it.

Having never done this before, I decided that I better do a trial run on it. While I plan to get a natural/unfrozen 14-15lb turkey for the main event, I did my practice run with an 11lb frozen (already injected, more to follow on this) butterball.

11lb thawed butterball turkey

Because the turkey was frozen, I had to buy it a few days in advance to give it plenty of time to thaw out in the fridge. I got it three days ahead of when I planned to cook it, and it's a good thing, because when I pulled it out to get started, it was still ever so slightly still frozen. But good enough to move forward. I put it in some cold water in a bowl to do the final thawing out as I got my smoker going.

For this cook, I wanted my Weber Smokey Mountain to average around 325F. Unlike my other big meats such as brisket or pork shoulder, the higher temp helps the turkey cook faster but more importantly, helps the skin get crispier. To fire up my smoker, I went with a full chimney of lit charcoal, and once they were in the base, I added half a chimney of unlit charcoal on top of it. When the turkey goes on, I popped in a few chunks of apple wood.

Cleaned out turkey

Once the smoker was lit and the turkey was completely thawed, I started "cleaning" it. To do this, I simply removed everything from the inner cavities and saved these for the drip pan (except for the liver which I threw away). I then trimmed any excess fat around the openings. And I untied the legs to let them cook openly.

Now there's lots of talk about brining poultry, including a turkey. If mine had not been injected with a salt solution at the factory (such as when I cook it on actual Thanksgiving), I will definitely do a brine to help the meat retain moisture. But since this had already been filled, I decided that I would instead inject the turkey with a brine just before I put it on the smoker. The injection was 4 cups of water, 2tbsps salt, and 1tbsp of sugar. Then I made my rub to go all over the turkey.

Dry rub prepared to go on the turkey

As always, credit to Amazing Ribs where I always start on my smoking research for anything new. There I got the recipe for this salt-free rub that seemed like it would go very well with turkey. It had a whole list of herbs, and you can find the specific recipe here.

Once the rub was ready, I put some in a bowl and added water to it to make a wet rub. Before I started putting it all over the turkey, I melted some butter and rubbed that all over it. That may have been liquid over-kill on the outside of the bird, but I figured who doesn't like a little extra butter on pretty much anything? Plus, butter helps the skin crisp up while it's smoking.

Put the wet rub all over the turkey

Rubbed up turkey from the front

Rubbed up turkey from the back

After rubbing the butter all over the turkey, I then put the wet rub all over, on both the outside and underneath the skin where I could. The turkey skin is pretty thick so it's actually easy to force your hands underneath it to really get the rub everywhere.

Drip pan to make thin gravy

The last thing to do before putting the turkey on the smoker was the get the drip pan ready. As mentioned earlier, I had already put the insides of the turkey, as well as the turkey neck, in the pan. I then added quartered onions, celery, carrots, and some of the dry rub. And then filled it nearly to the top with water. Not only would this collect the drippings from the turkey, but the water will help add moisture to the smoker, in place of my usual water bowl.

Turkey on the smoker

And with that, the turkey was ready to go on the smoker. I put the drip pan on the lower rack, as you can see in the picture above. And then the turkey went on top with the meat thermometer plugged into the thigh, because it's the thickest/meatiest part of the bird.

And then, we wait. This was a low maintenance smoking session so there wasn't much for me to do but make sure the smoker temp stayed around 325F. My plan was to pull the turkey when it got to 160F in the breasts, as that would mean the legs/thighs are probably closer to 170F. My expectations were for an 11lb turkey to take about 2.5-3 hours to cook.

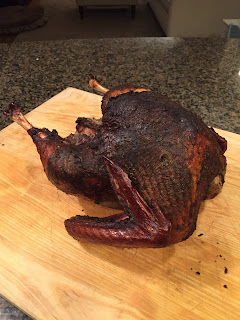
Finished product - smoked turkey!

Smoked turkey from a different angle

And one more angle - from the back

Drip pan filled with the "thin gravy"

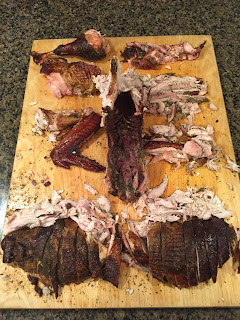
Carved up turkey - let's eat!

Sure enough, after almost exactly 2.5 hours, the turkey was ready to be pulled. The meat thermometer was only reading 152F - short of my 160F target - but when I went and checked it with my thermopen, I saw a number of 170F+ readings. I was actually worried that I had over cooked it, but that wasn't the case.

I pulled the drip pan out and poured the contents through a strainer so just the liquid "thin gravy" would be saved. This was used as an add-on to the turkey, not as much in a traditional gravy sense, but more as an au jus to complement the meat. I think it was pretty water-y, a bit too much for my liking, but it would be very helpful if the meat is a little too dry.

I carved up the turkey right away, as there really was no reason for it to sit around. And you can see from the last picture above the final display. I carved up one each of a drumstick, leg, and thigh, and left one of each un-carved. I then carved up the breasts completely.

I think everything tasted pretty good. The moisture was excellent - the meat was very juicy - so I was happy with my limited brining decision. Plus, it wasn't too salty which was another thing I worried about with brining. The only thing I didn't love was I had too much of the rub on the breasts. It was an overpowering flavor on the part of the meat. When I do it again for Thanksgiving, I'm going to go a little lighter on how much I put on the turkey. Otherwise, everything was great. 

SMOKING RECIPE CLIFF NOTES:
- Clean out turkey insides and trim fat
- Inject the turkey with a light salt brine
- Make the salt-free rub and mix with some water to make a wet rub
- Cover the turkey in melted butter
- Spread the wet rub all over the turkey
- Put the turkey on the smoker at 325F until the breast meat hits 160F (~13 min/lb)
- Pull the turkey, carve it up, and serve


Monday, June 26, 2017

Smoked Almonds

SMOKING RECIPE CLIFF NOTES:
- Soak raw almonds in water for 10 minutes
- Remove almonds from water and cover in rub
- Put the almonds on the smoker at 225F
- Let them smoke for 1-1.5 hours, stirring/flipping the almonds half-way through
- Remove the almonds from the smoker and allow them to cool for 15 minutes before serving

Two weekends ago, I decided I wanted to try something entirely new on the smoker. And I also didn't want to spend all day doing it. So I decided to give smoked almonds a try.

I started off with my usual recipe research, and when I came across this post from my usual favorite site, I realized that I could be a little flexible and creative with my approach without there being much issue.

So I went to Costco and bought a huge package of raw almonds. I started off by getting my smoker going, and knowing I didn't need to cook for very long, I went light on the number of coals I lit. I got my smoker running around 225F and then got to preparing the almonds (warning: pictures aren't particular exciting for this post).

Almonds soaking in water

Almonds ready to go on the smoker

The first step in prepping the almonds was to let them soak for 10-15 minutes in water. This just helps them soften up to take on the smoke, while decreasing the chances of them getting burned.

I then pulled them out and through them in smoker safe pans. I had to split them up because of the size of my smoker, and I was going to try to two different recipes. The picture on the left shows the almonds that I rubbed up with some Plowboys Yardbird rub. The picture on the right shows the almonds that I simply covered with salt & pepper.

Almonds on both racks of the smoker

After that, I put both pans of almonds on the smoker, on separate shelves just because they fit better. Again, I had the smoker running around 225F.

Now I had read some recipes that said to let them cook for 30 minutes, and others that said to let them go for 2-3 hours. Given we had some errands to run, I decided to go with the longer time frame to let them get more smoke.

The only thing I had to do in the middle of the cooking was give them a little stir to flip them around so they weren't just sitting on one side the entire time.

Almonds fresh off the smoker

I left the almonds on for about 1.5 hours all-in. When I pulled them off, I then let them sit for about 15 minutes before trying them, so they would cool off and harden a bit.

Upon eating them, there was a clear favorite. The almonds I had covered with actual rub were really good. Great smoky flavor, with enough seasoning from the rub to give them a great taste. The plain salt & pepper covered almonds weren't bad, but compared to the others, they were really lacking.

So the lesson was to use rub! But this was a really easy and tasty snack, and I plan to do more soon and just create a big batch to have around.

SMOKING RECIPE CLIFF NOTES:
- Soak raw almonds in water for 10 minutes
- Remove almonds from water and cover in rub
- Put the almonds on the smoker at 225F
- Let them smoke for 1-1.5 hours, stirring/flipping the almonds half-way through
- Remove the almonds from the smoker and allow them to cool for 15 minutes before serving

Thursday, June 1, 2017

Red White & BBQ MDW '17 Competition

I remember a quote from my Catholic school days "the first shall be last, and the last shall be first". Well, I'm going to go ahead and agree with that today. In particular, as it relates to the results of my recent Memorial Day Red White & BBQ competition.

But before I get into that, the real focus on this post is the details of the day. And I should really lead in with just how much fun a day of being in a formal BBQ competition is. I can't wait to do more.

My 2nd ever official BBQ contest

This was the same contest I entered last year. It's an amateur "backyard" contest along side a professional contest. While the pros turn in the standard 4 meats (brisket, pork shoulder, ribs, chicken), they have us amateurs turn in just ribs and chicken.

Once again, my friend Brian joined me as my partner, and he handled the chicken while I handled the ribs. In last year's contest, we came in 12th place (out of 60 teams) overall, with Brian's chicken ranked #12 and my ribs #19. Promising start with room for improvement! Needless to say, our hopes and expectations were higher for this year.

The day started bright and early, as we needed to get to the contest for check-in by 7am. I did plenty of prep work the night before to make the morning as smooth as possible. This included multiple store runs, packing the car (next year, I should just rent a Uhaul!), and most importantly, trimming my ribs. As it turns out, we learned that as long as you don't apply any rubs, marinades, etc to the meat, you free to trim & clean it in advance. Given how much easier this is to do in my kitchen as opposed to the middle of a field, I took advantage of it.

Getting setup for the day

When we got to the contest, we staked a claim to our spot and started setting up. As you can see in the picture above, it basically looks like a tailgate. And quite frankly, we treat it like a tailgate all day long, which is a huge part of the fun for us and everyone else who comes to enjoy it.

Once we're set up, we have plenty of time before the ribs and chicken go on the smoker, so we got to relax for a bit with some breakfast. Pretty sure we were the only BBQ contestants drinking mimosas (thanks to Brian). I also decided to get my smoker going to just let run for a bit to get it to the right temp before my ribs went on it. Standard minion method approach as discussed in previous posts.

KCBS sanctioned - makes it official!

Around 9am we had the "captain's meeting". This is when we go into the tent with all the other competitors, and the KCBS sanctioned hosts go over all the the rules of the contest. Nothing new, but serves as the kick-off to the contest.

Ribs rubbed up and ready to go on the smoker

After another hour or so of just relaxing - it happened to be a beautiful day - it was time to get my ribs ready for the smoker. My ribs were due to be turned in promptly at 3:30pm, so I wanted to get them on the smoker 5 hours in advance - 10:30am. The above pic is my ribs all rubbed up. Next step was to add some brown sugar and honey on top, and toss them on the smoker around 235F.

Then, as is always the case with BBQ, we wait. Which meant Brian and I had a few beers and played a few games. Late morning, my wife showed up with lunch for us, and ready to help out. She decided to take over on the box preparation, which is great because cutting and trimming a bunch of parsley and lettuce to look good in a styrofoam box, while important to BBQ competitions, is not my forte.

Sous chef working the box prep

Smoker set-up complete

As I always do when cooking ribs, I let my ribs sit directly on the smoker for 2.5 hours. During that time, every hour or so I add more wood and spray the ribs with an apple juice/vinegar combo, to keep them moist.

Ribs getting wrapped

When those 2.5 hours pass, I pull the ribs off the smoker and getting them wrapped. The picture above shows me in action at this point. My approach is to lay out the foil, spread some pepper jelly, brown sugar, and honey on it, and then set the ribs on top of that. Then put a little more pepper jelly, brown sugar, and honey on the other side of the ribs, wrap them up tightly (double-coated foil), and they're ready to go back on the smoker at 240F for another 1.5 hours.

Unfortunately I do not have any pictures of Brian and his chicken, which I don't really have any good excuse for. But at any point, around this time Brian started preparing his butter bath, and getting his chicken cooking in there for a while. I don't recall the exact amount of time he puts the chicken in the bath, but the idea is to add flavor and make the skin better prepared for direct smoking.

Because the chicken is due at 3pm, earlier than the ribs, while my ribs on wrapped and foil and on the smoker for 1.5 hours, thats when Brian takes cares of all his work. By 3pm, he's pulled his chicken off the smoker (at this point the thighs had been on the smoker directly with some BBQ sauce), we picked out the best looking ones, and they went in the box for turn in.

Ribs back on smoker for sauce/finish

At 3pm, I pulled my foil-wrapped ribs from the smoker. I simply take the foil off and throw them back on the smoker directly. I like the smoker to be hotter for this point, so I had it running up closer to 270F. Ribs go on, and I proceed to sauce one side and let it set for 10 minutes, then flip and sauce the other side and let that set for 10 minutes. You can see my doing this in the above picture.

Pre-cut finished product

Slicing 'em up

Still slicing while picking the good & the bad

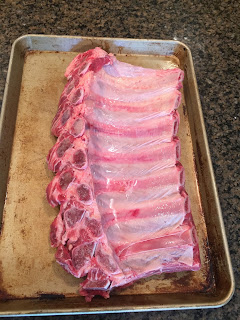
Once the ribs are finished, around 3:20pm - 10 minutes until turn-in - I start slicing. I find it easier to slice them evenly if I flip the rack over and slice from the bottom. As I do this, I pick the ones that look good and put them in a separate pan from the ones I don't think look as good.

The key to which ribs look "good" is a combo of good amount of meat, good smoke ring, straight looking bones, and uniform looking cut. I think pick out 6 of the "best" looking ribs to put in my box for turn-in. I also sneak a quick bite of one to make sure everything is good. More on this in a moment, but I thought they came out great!

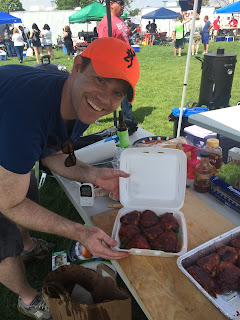
Modeling my completed box

Finished product ready for the judges

And after turning my ribs into the judges at 3:01pm (you get +/- 5 minutes), the hard work for the day is complete. At that point, Brian & I, along with my wife and some friends, enjoyed all the leftover, non-turned in, ribs and chicken. We all agreed everything was delicious, and we were pretty excited to see if we improved on our 12th place finish from the previous year.

Well, as it turns out, the BBQ gods were not with us this year. I always told everyone when I explained how BBQ contest judging works that you never know 1) what the particular judge's taste buds prefer as far as flavoring goes (spicy vs sweet, etc), and 2) for any variety of reasons, sometimes meat just doesn't turn out the way you expect.

To cut to the chase, my ribs got #39/42! And Brian's chicken got #42/42. And overall, we got #42/42.. that's right - dead last place!! The audience of friends I had assembled all felt bad for me and was supportive, telling me the judges don't know what they're talking about - which was nice. But I knew it was just the way it goes sometimes. I actually noticed that a team that got #5 overall last year ended up this year with #38/42. So, as I said, it happens. I bet they were angrier than I was!

In looking at my scores, I scored mostly 7s ("above average") on the 1-9 scale, which really isn't bad. But I didn't pull off many 8s and exactly zero 9s, which make a big difference in the scoring system. And apparently, everyone else did that day. 

My appearance scores were my strong point. This made sense as you can see my box above - it looked great! But unfortunately, appearance scores carry the least weight.

My taste scores were middle of the road. I thought the taste was good, but I definitely didn't have the spice that I usually like to have. Not entirely sure why - maybe not enough rub or pepper jelly. But perhaps that's what the judges were missing. This carries the most weight, so it hurts to not get more 8s & 9s in this category.

Lastly, my tenderness scores were the worst. This surprised me because my tenderness is usually great (my high point in last year's contest) and I even tried my ribs and felt good about it. However, as BBQ sits and cools, the tenderness gets worse and worse. It's possible that my ribs were randomly one of the last boxes eaten, and as a result, the tenderness suffered. We'll never know.

Anyway, that's the run down of my second ever BBQ contest. No where near the results we wanted, but still an incredibly fun day. And Brian and I have already decided we need to find more contests to enter! Hopefully the next time I post about one, it's with a better outcome.


Monday, March 20, 2017

Competition-Style Chicken Thighs

SMOKING RECIPE CLIFF NOTES:
- Trim bone-in, skin-in chicken thighs, removing as much fat as possible and making them all look similar
- Make a brine of water, apple juice, sprite, salt, pepper, brown sugar. Submerge thighs in it for 2 hours in fridge.
- Remove thighs from brine, rinse with cold water, and put the rub all over including underneath the skin
- Place each thigh on top of butter in a foil pan for butter bath, and place on the smoker at 275F
- After an hour, remove thighs from butter bath and place directly on smoker
- After another 30-60 minutes, when the internal meat temp hits 165/170F, pull from smoker
- Cover thighs in BBQ sauce and place back on smoker at 300F to caramelize
- After 15-30 minutes, remove from the smoker and serve

I'm now 3 years into my obsession with smoking meats/BBQ, and have yet to try out chicken thighs. Why, you may ask, would I avoid them? Especially considering they are a main part of competition BBQ? Well, I have no idea. But this past weekend, I decided that needed to come to an end.

I cook chicken on the grill regularly, and we all really enjoy it. Maybe because it's so easy to do that, I've always favored that approach. But after this weekend's attempt, I realize (duh!) just how much better they are when smoked.

I decided to approach this as I would a competition, which is why I titled this post "competition-style chicken thighs". There are some parts of this recipe that are a waste of time for backyard BBQ. But it always feels more fun to take it too seriously anyway. So, without further adieu...

I bought a pack of 10 bone-in, skin-on chicken thighs from my local grocery store. Nothing special. I brought them home and although I wasn't going to cook them until the next day, I decided to clean and trim them in advance.

To do this, I peeled back the skins and trimmed away any excess fat. I also used a small knife and scraped away some fat on the underside of the skin. This supposedly helps make the skin thinner and easier to bite through - a key component of competition judging. It didn't work for me, but I'll get into that later. I also cut off any pieces of meat that were sticking out, in an effort to make all the pieces look as similar as possible. Once I finished, I put them all in a container and into the fridge for the next day's cook. Then I watched hours of the NCAA tournament, including a disappointing upset of my Fighting Irish. At least I had BBQ to look forward to!

The next day around 12:30pm I decided to get a brine ready to put my chicken in for a few hours prior to cooking. My brine recipe was really simple with approximate amounts: 1 cup of water, 1 cup of apple juice, 1 can of Sprite, 1/4 cup of kosher salt, 2tsps black pepper, 2tsps brown sugar. I used less salt than a typical brine may call for because my rub has salt in it and I'm constantly worried about over-salting poultry when I brine it. Anyway, mixed it all together, poured it all over the chicken, and placed back in the fridge.

About 2 hours later, around 2:30pm, I pulled the chicken from the brine and rinsed each piece off in cold water. I then put it back into the fridge.

Chicken thighs post brine

You can see I didn't do an A+ job with my skins staying wrapped around the chickens. The best competition cooks put a lot more effort into this, making sure the skin wraps all the way around, using toothpicks (or other materials) to keep it together throughout the entire cook, etc. I didn't want to spend that much time on it. And the thighs looked uniform enough for my liking.

I wanted to get the chicken on the smoker around 4pm, anticipating a 1.5-2hour cook. So around 3pm I got the smoker lit, utilizing a smaller than usual minion method with more lit coals to start. I also did not fill the water pan. I wanted the smoker to run hot, aiming for a 275-300F for cooking.

I then pulled the chicken thighs from the fridge and started rubbing them up. I used Plowboys Yardbird Rub, and made sure to get all over the thighs. This included peeling the skin back once again, and rubbing the meat underneath it, and then putting the skin back on top and rubbing on top of it. Once again, I wanted to make sure not to overdue the rub for fear of making it taste too salty.

Plowboys Yardbird Rub

Rubbed up chicken thighs

I decided to start the cook with the chicken in a butter bath. Many cooks use this approach to add some flavor (who doesn't like butter on their food?) but also it's supposed to help with the texture of the skin. I'm not sure I needed it for backyard BBQ, but I decided to go with it anyway. I used one stick of butter cut into 10 pieces to lay each thigh on top of, skin-side up, and then cut up another stick of butter to sit on top of the chicken. Paula Deen would be proud! I then put the pan on the smoker around 4pm at 275F, and added 4 hickory wood chunks (I would have preferred apple wood but didn't have any on hand).

Butter in the foil pan to place thighs on top

Rubbed up thighs in the foil pan with butter on top ready to go on smoker

Standard WSM shot!

After about an hour, around 5pm, the chicken was ready to leave the butter bath and go directly on the smoker. I should note, the butter bath came up about half-way on the chicken. I read that you do not want to have the thighs submerged in butter. Anyway, I pulled each thigh out of the bath and put directly on the smoker. I then drizzled a little honey on top of each thigh to add a little extra sweetness. Again, I kept the smoker temp around 275F.

Chicken thighs pulled from butter bath and placed directly on the smoker

At this point, I decided to heat up some BBQ sauce. I used Plowboys as well (coincidentally, I promise I wasn't being sponsored by them - though I'm open to it if they're reading this?), and I added some honey to it to make it a little sweeter. I cooked it on the stove with the hopes of thinning it out a bit. I read I could have added some Coke to it also, but I didn't have any and am not sure I really needed it. I let that sit on the side waiting for the chicken to be ready for it.

After about 30 minutes, I started checking the internal temperature of the thighs. My target was for 165-170F. At that point, they were all running a little cooler around 150F, so I left them on a bit longer. After another 15 minutes (5:45pm), I checked once again and had hit the target. So I pulled them off and brought them inside to sauce them.

I typically aim for little to no sauce on my BBQ, but I wanted to try making the sauce a bigger part of the chicken. So I dipped each thigh in the sauce pan, completely submerging them. It worked out great for taste, but in hindsight, it was over-sauced. I'll do it lighter next time, brushing sauce on like I do with my ribs. I added a small sprinkle of brown sugar on each piece as well to give them more sweetness, and I then put the sauced chicken back on the smoker at 300F to finish them and caramelize the sauce a bit. I left them on for about 20 minutes, and then pulled the finished product.

Chicken thighs hitting the 165-170F mark, ready to be sauced

Finished product - (over-sauced) chicken thighs

In the end, the taste of these thighs was really really good. I underestimated just how much value the smoke brings to the table (vs my standard grilling). There was a slight bite to the chicken, I guess because of the rub, and the sweetness I added was really great. The meat was also extremely juicy, which was thanks to a combo of the brine and being on top of the meat's internal temperature.

A lot of the preparation effort I put into this was to make it such that when someone bites into the thigh, they bite right through the skin. As opposed to pulling it all off. Also, it's in an effort to make the skin crispy. Well, save a few exceptions, my skin was definitely not crispy, and slid right off with the first bite. So that's something for me to work on for a competition. 

But fortunately, it has no bearing on people's enjoyment! This is a definite keeper and I won't wait as long until the next time I do chicken thighs on my smoker - definitely going into the regular rotation!


SMOKING RECIPE CLIFF NOTES:
- Trim bone-in, skin-in chicken thighs, removing as much fat as possible and making them all look similar
- Make a brine of water, apple juice, sprite, salt, pepper, brown sugar. Submerge thighs in it for 2 hours in fridge.
- Remove thighs from brine, rinse with cold water, and put the rub all over including underneath the skin
- Place each thigh on top of butter in a foil pan for butter bath, and place on the smoker at 275F
- After an hour, remove thighs from butter bath and place directly on smoker
- After another 30-60 minutes, when the internal meat temp hits 165/170F, pull from smoker
- Cover thighs in BBQ sauce and place back on smoker at 300F to caramelize
- After 15-30 minutes, remove from the smoker and serve

Friday, March 10, 2017

Guess Who's Back

I have a lot of excuses for being absent the last 1.5 years.. kids, work, sports, laziness, etc. But who cares. I'm back, and plan to improve going forward. In the meantime, a quick recap of some of the more key or unique BBQ activities in my life since I last blogged....

Westmont Red White & BBQ Competition

I'm giving this one a special highlight because it was my first competition. It's Illinois's largest BBQ competition, and just happens to be minutes from my house, so couldn't be more convenient. It's KCBS sanctioned, and they have a pro contest and an amateur contest. 

The amateur contest, which is what I did, consists of ribs and chicken. I did it with my friend Brian Hansen who is just as into BBQ as I am and we plan to continue being a competition team going forward (including doing this competition again in 2017). To separate our duties, I handled the ribs, and Brian handled the chicken.

There were 60 competitors and we looked like the absolute least experienced. But it was so much fun and we ended up place 12th out of 60, which I was happy about. Brian's chicken placed 12th and my ribs placed 19th (my bad, Brian!). I have a few ideas for what I'm going to do differently in 2017 to try to improve upon that. Anyway, it was a blast of a day and great experience. 
 Our setup, just like a tailgate (which we have plenty of experience with thankfully)

Preparing the chicken box. By the way, it's a lot harder doing this outside (with wind) instead of in my kitchen.

That's a 12th place chicken box

Proud chicken cook

Cooked 3 slabs to pick 7 rib bones to put in the box

Careful assessment of the "best" bones

Proud of my rib box as well

Our 19th place rib box... plenty of room for improvement in 2017!


Now, a few quick looks at some newer stuff I cooked in the last 1.5 years. There's plenty I don't have pictures of, so I won't mention. And of course, I had plenty of days cooking the standard ribs, pork shoulder, and brisket. Each of these deserved their own post with directions on how I cooked them, but you'll have to just settle for the few pictures and captions instead, sorry!

Beef ribs!

Silver skin on the back is a lot tougher than that of pork ribs. I had a hard time getting it off.

But, eventually did...

Used my brisket rub for them, but probably over did it a little because they were a little too salty in the end.

Looked really good on the smoker

Finished beef ribs..

They were good but a little too salty (too much rub, perhaps?) and they were heavy. Each one was like eating a bunch of brisket. I like pork ribs better, but these were still good. A nice occasional alternative to the norm.

Full chicken.. it was really juicy and smoky - a great combo. I just have to get better at carving it up.

Nothing new here, just another pork shoulder. But I did recently do a small bone-in pork butt (not pictured) that was only 3.5 pounds and it was quick and easy to cook and came out great. A great option when I don't have all day to cook an 8lb shoulder.

During one of our many trips to KC, I stopped by the original Oklahoma Joe's BBQ (now regretfully called "Joes Kansas City"). It is in a gas station, which just seems perfect for BBQ.